You installed a Palo Alto firewall in your infrastructure, started the device, and asked yourself: Okay, now what? No problem. The Palo Alto user interface is amongst the easiest to learn and navigate. Below, I will do my best to make it easier for you to continue implementing so that your firewall is best optimized for your infrastructure. To begin with, I will set the key points specific to each Palo Alto firewall:
- Start your firewall and follow the start, reset, shutdown sequences
- Register your Palo Alto firewall
- License your Palo Alto firewall.
- Initial setting
- Update
- Administration
1. Starting
It does not matter if it is a physical or virtual firewall. It is a perfect practice to save time and eliminate potential setbacks if the firewall, for some reason, crashes into some reboot loops, throws out database errors, etc. With great confidence, engineers often think that the new device will boot without problems. Hence, they put it into production immediately, and after the first update and restart of the request, the question comes: Has the device reloaded been tested? The start, resume, and shutdown sequences are best tracked through the CLI, where potential errors will be shown.
This is just an example of good practice and is most desirable for virtual appliances due to the software version’s compatibility with the server infrastructure on which it is booting, well-paired interfaces, etc.
1.2: Login
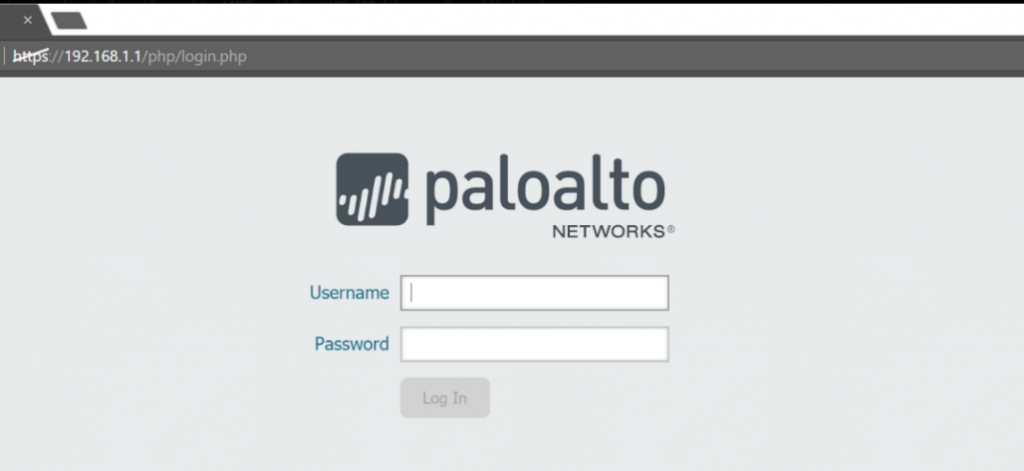
You can do the initial login from GUI and CLI mode. After 7-8 minutes as needed for a complete boot, the login prompt will be displayed. The default username and password are admin/admin. If Palo Alto does not let you in, it is likely since the firewall database has not been fully booted, so wait a few more minutes. After pressing enter, another prompt will appear where you will be asked to enter a new password. By default, password complexity is enabled, so your password must be a minimum of 8 characters, with a combination of letters, numbers, and a special character. You can turn off password complexity later.
1.3: Palo Alto Web User Interface
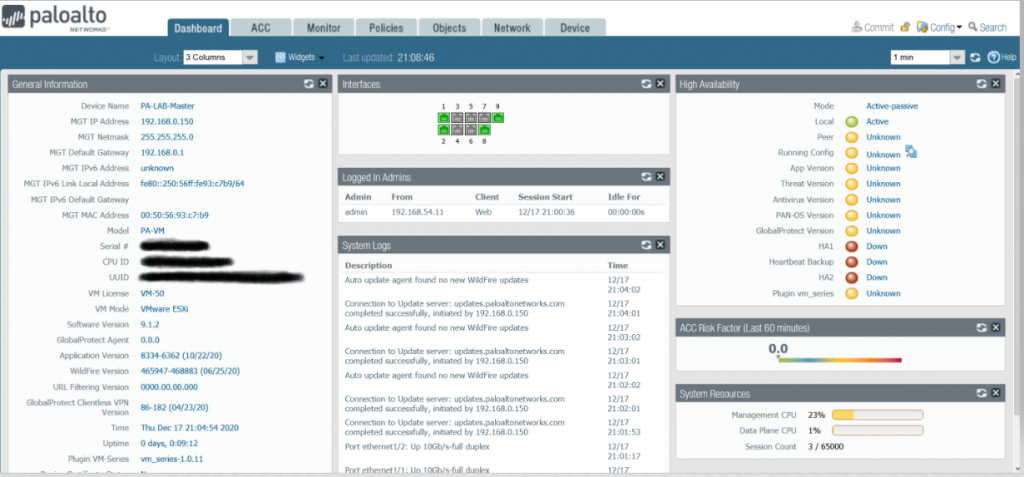
1.3.1. Dashboard
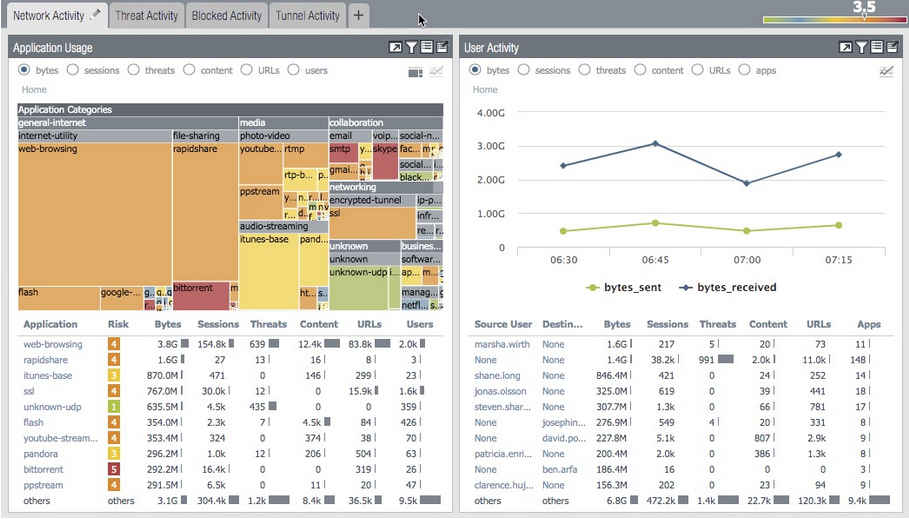
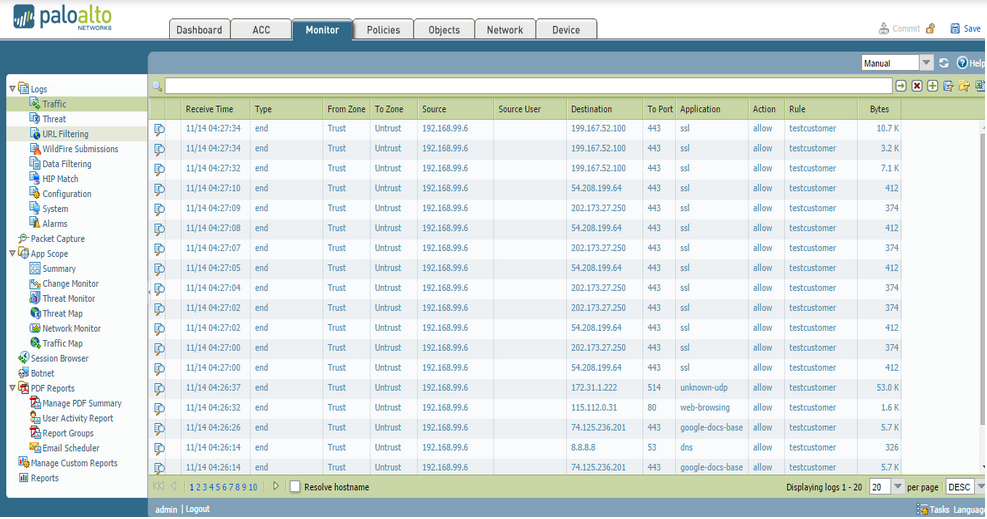
1.3.3. Monitor – Your Best Troubleshoot Friend
The Monitor tab displays all traffic logs that pass through the firewall. In the case of security policies, it is necessary to enable logging in for each policy. Some fundamental division: Traffic logs, Threat logs, URL Filtering logs … For each of them, you can view the time, source, destination, users, applications, and ports/services that each session left behind.
1.3.4. Policies
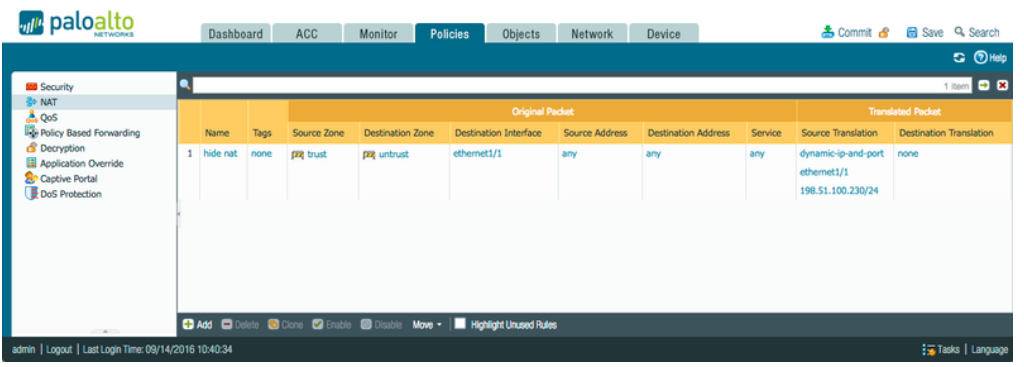
A policy tab allows you to create policies to manage your firewall traffic. Each policy must contain the name, source zone, destination zone, and the action to be performed on the traffic that matches that policy.
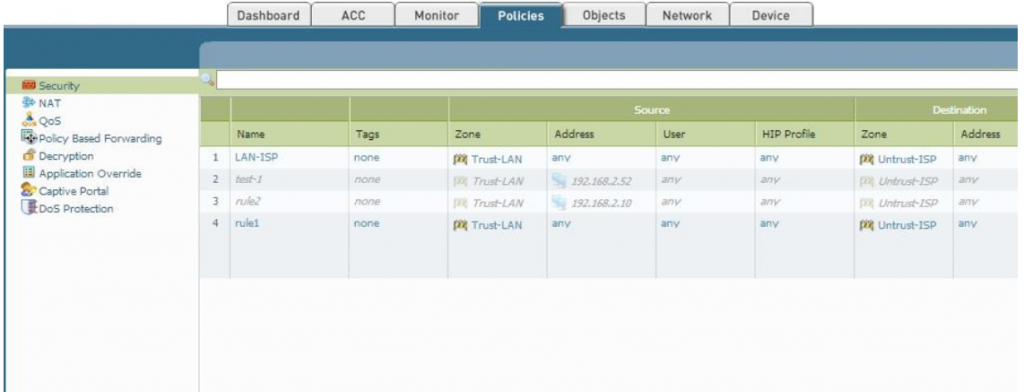
If it is a policy that regulates traffic to and from the Internet, you need NAT policies that go hand in hand with security policies. There are several types of NAT policies, and each of them is used in specific cases. Many-to-One, Hide NAT, Source NAT, One-to-one NAT, Static NAT, Bi-Directional and Uni-Directional NAT policies.
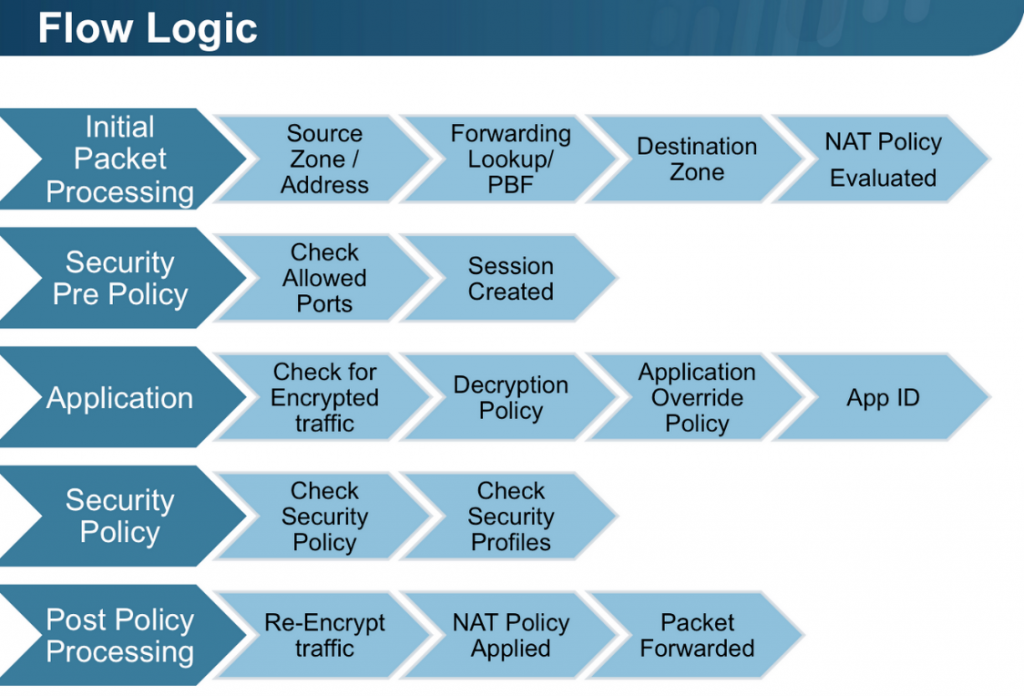
To properly understand traffic flow, it is necessary to understand the logic by which Palo Alto manages the sessions. The scheme below represents a simplified (really simplified) version of the traffic flow. You can find a more detailed description in the link. Palo Alto is a firewall whose rules are based on zones and apply its rules to zones, not to interfaces.
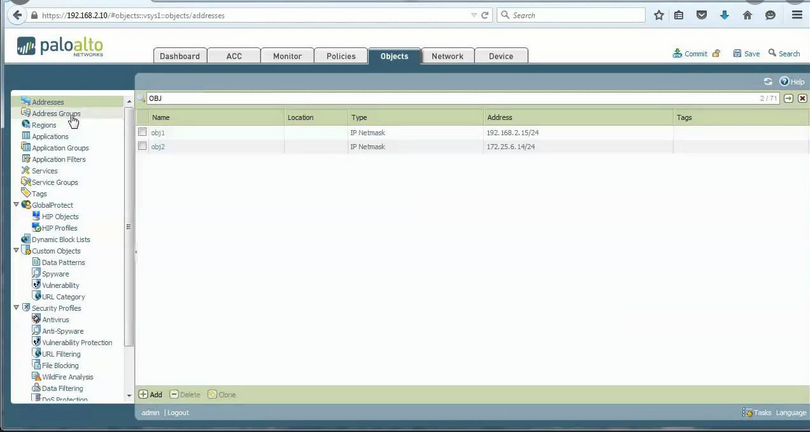
1.3.5. Object
The object card is used to name all the most frequently used IP addresses, services, applications with more recognizable names to make them easier to use later in policies. By using objects, you help yourself later if there is a change in the object’s attribute, for example, a change in the public IP address, that only by changing the IP address within the object, change that IP address in all places where you called that object. It saves you time and avoids potential problems if you change that IP address everywhere. Also, it is easier to remember object names than IP addresses.
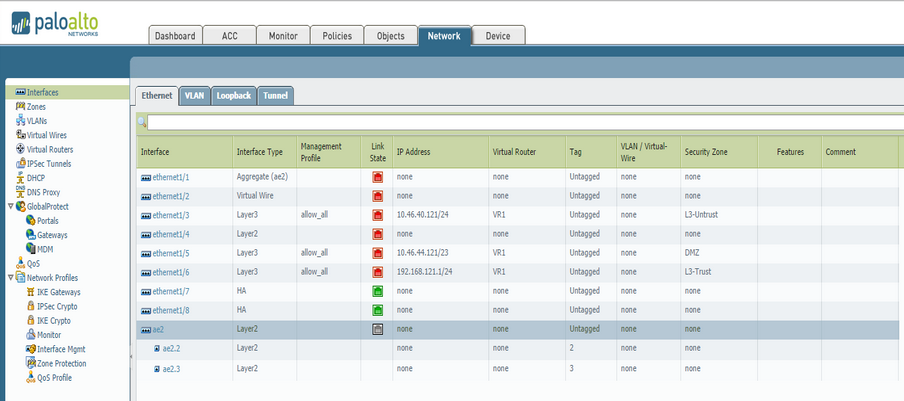
1.3.6. Network
The network card is where you configure the interfaces you associate with zones. These can be Ethernet, Vlan, loopback, and tunnel interfaces. There you will also set up VLANs, routing, DHCP pools, VPN tunnels, QoS profiles …
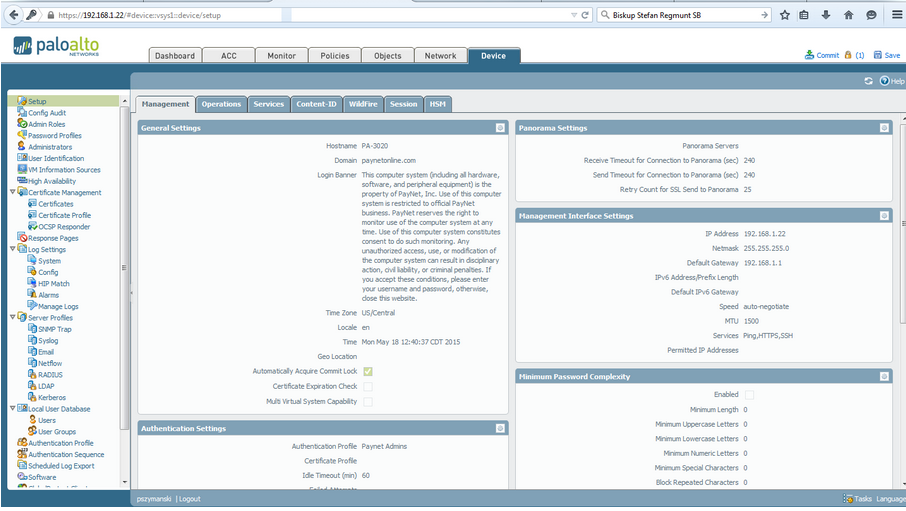
1.3.7. Device
The tab device is where you set up your firewall under the hood. Here, you will find settings for the management interface, DNS, updates, high availability (HA), logins, administrators, certificates, authentication servers, and profiles.
We went through the whole firewall, in a nutshell, to later know where to configure some Palo Alto feature, and there are plenty of them. First, I will mention security policies, NAT policies, IPsec tunnels, DHCP, monitor card management, high availability, routing, and many others.
But first of all, what to do first after building a new system? Before you put a firewall into production, set up software first. I mean the latest definition updates for Anti-Virus, Anti-Spyware, Vulnerability Protection profile, URL, Filtering, WildFire Analysis, etc. Note, all these add-ons are related to licenses. Therefore, it is first necessary to license the device to make updates.
2. Registration
Before you start using Palo Alto, it is necessary to register it on the portal, activate the licenses on the portal, and activate the same licenses within the Palo Alto firewall. Register Palo Alto on Palo Alto Customer Support Portal. If it is a physical firewall, use the dashboard’s serial number. For VM versions, you need the auth code from the purchase order. Follow the wizard and fill in the required information, and thus you have registered the firewall.
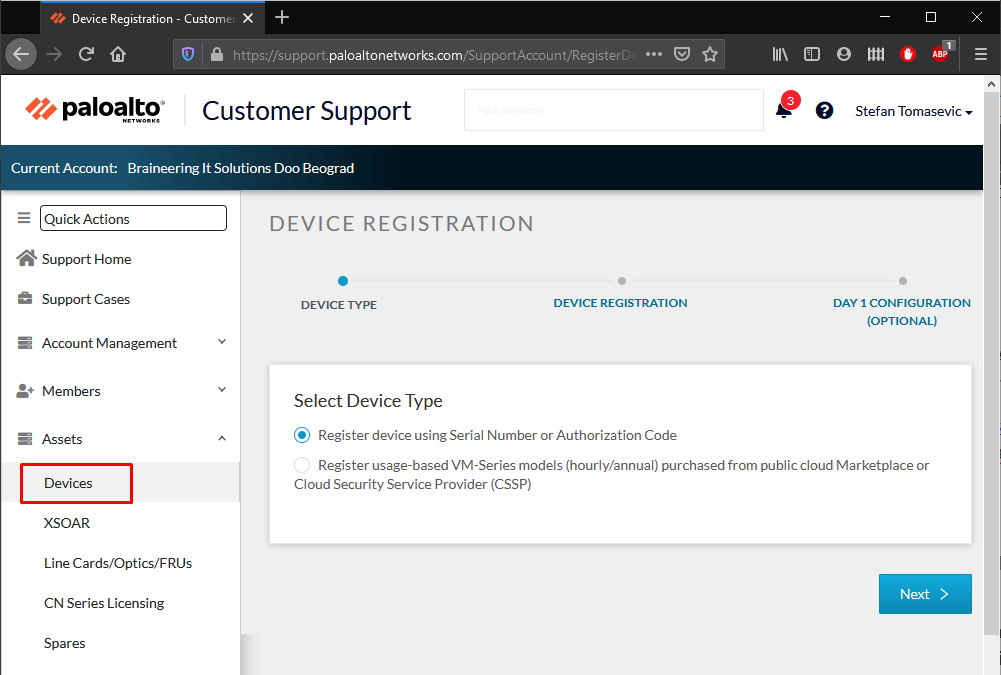
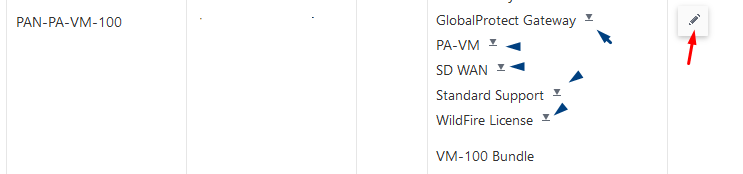
When you buy the VM version of Palo Alta, you also receive a set of authorization codes via email. Enter these authorization codes on the portal within the newly registered firewall. Add a new authorization code (red arrow) or download licenses to manually upload them on Palo Alto (blue arrow).
3. Licensing
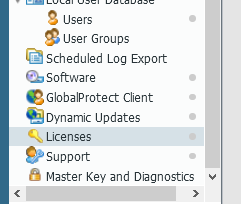
Devices > Licenses
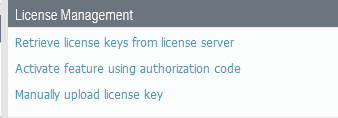
To automatically activate licenses within the firewall, you need to configure the IP address, mask, default network interface, and DNS server. You can do the licensing manually by uploading the licenses in the format number-threat.key, where the word threat represents the firewall feature you bought, and it can also be DNS, Support, Threats, URL, Wildfire… You can even automatically retrieve licenses by clicking on the Retrieve license key from the license server, after which Palo Alto will retrieve the licenses from the server. (Internet connection required).
4. Initial setting
4.1. Management
Device > Setup > Management
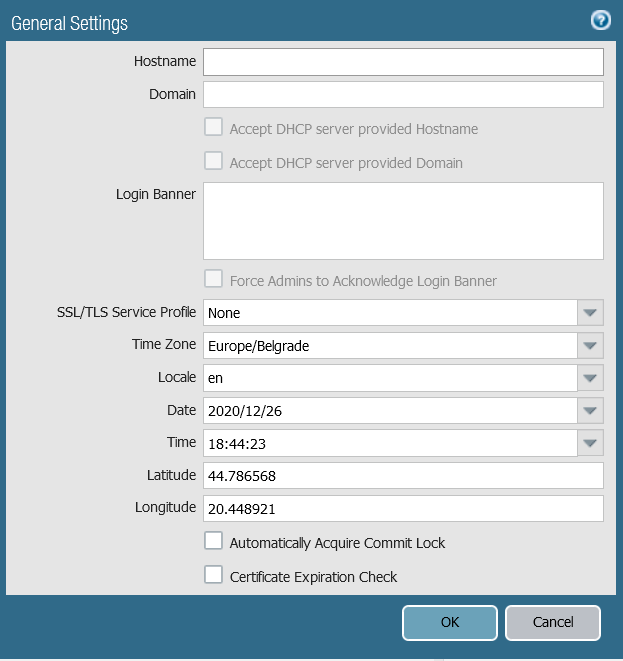
- Configure the hostname and domain name
- Check Accept DHCP server provided Hostname or Accept DHCP server provided Domain if the management interface is set via DHCP.
- Login Banner is an optional text that will be displayed to each user as a warning or notification before logging in
- Latitude and Longitude are used to position the firewall on the map within the ACC and Monitor tabs.
4.2. Configuration
Device > Setup > Operations
Used to manage the configuration, reset, and shut down the firewall.
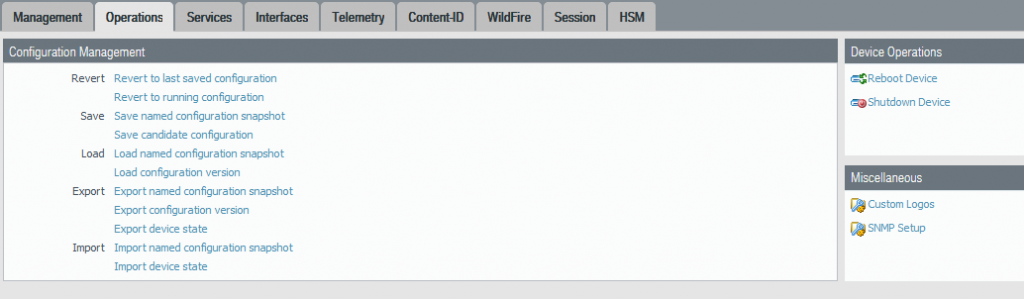
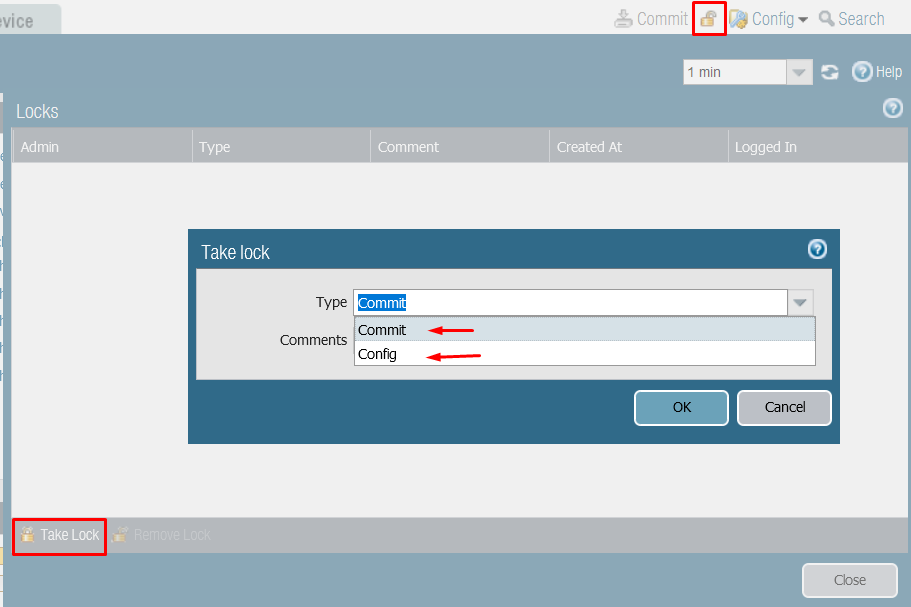
When your Palo Alto maintains multiple administrators, commit/config lock is a very welcome command.
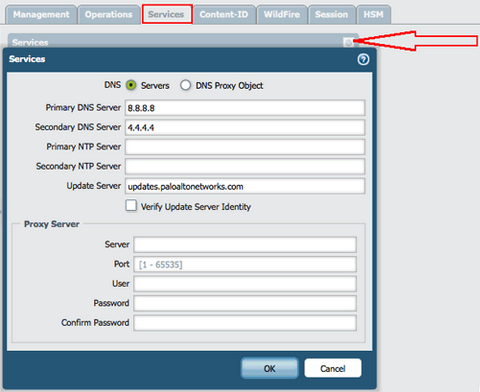
4.3. Services
Device> Setup> Services
Used to configure the DNS and NTP servers of your firewall. DNS is required for Palo Alto to retrieve updates from the server. NTP is optional but is recommended.
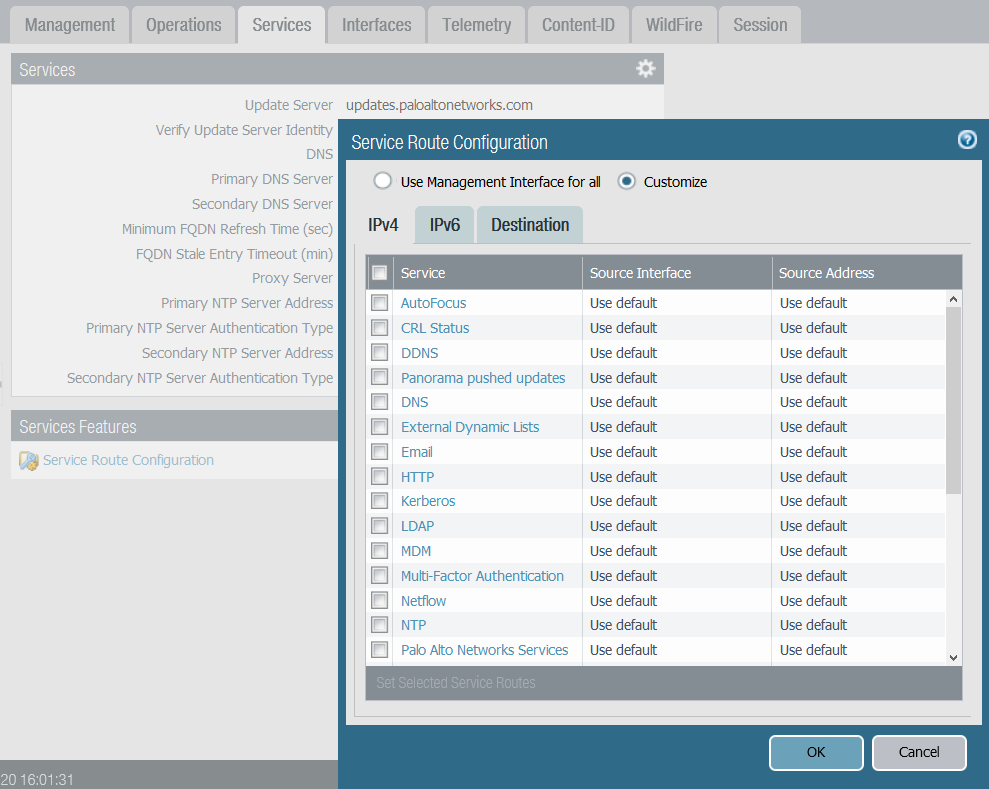
4.3.1 Service Route Configuration
Device > Setup > Services
Here you set the way Palo Alto communicates with the update server (update.paloaltonetworks.com). By default, this is the management interface. Still, if you do not want external networks to access your management network, the option is to configure another interface through which the firewall will receive the update.
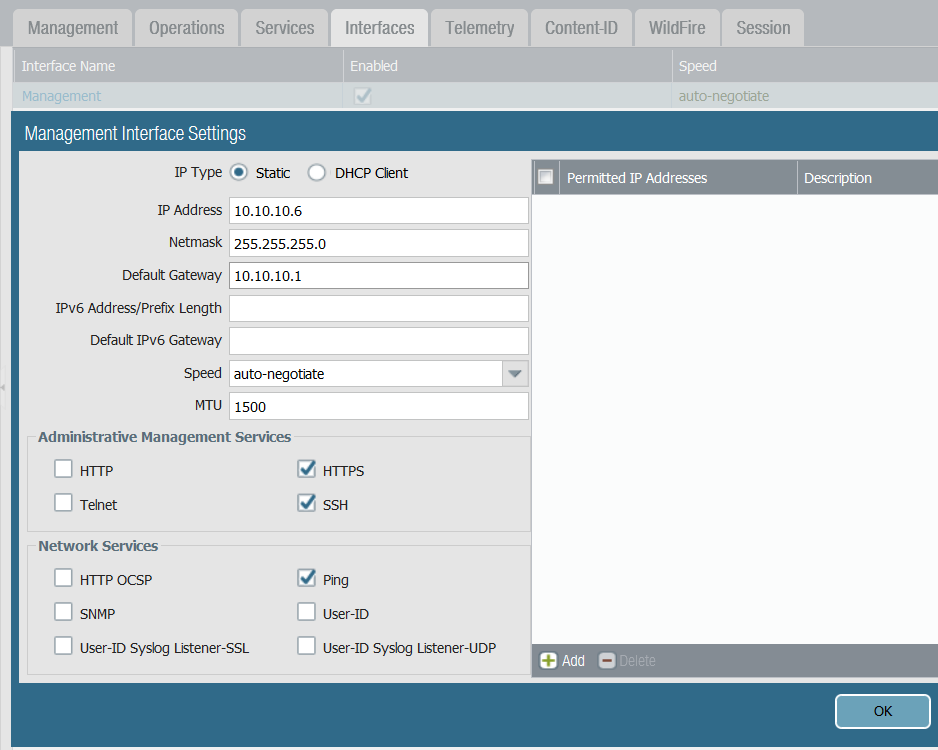
4.4. Management interfaces
Device > Setup > Interfaces
Here you can set the management interface and the address by which you will access the firewall. By default, HTTPS, SSH, and Ping are enabled. (HTTPS for web interface management access, SSH for CLI access, and Ping for interface response, HA capabilities, etc.). Permitted IP Addresses represent the range of addresses you will allow access to the firewall.
5. Updates
5.1 Update security profiles
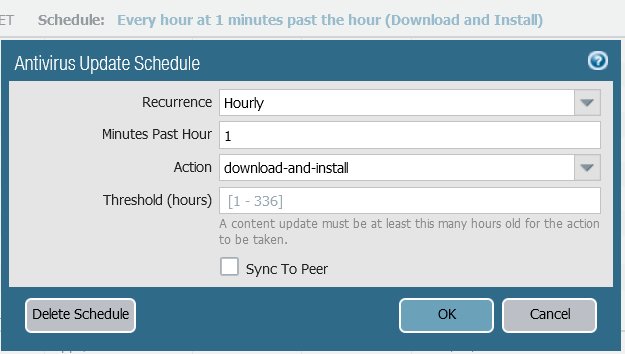
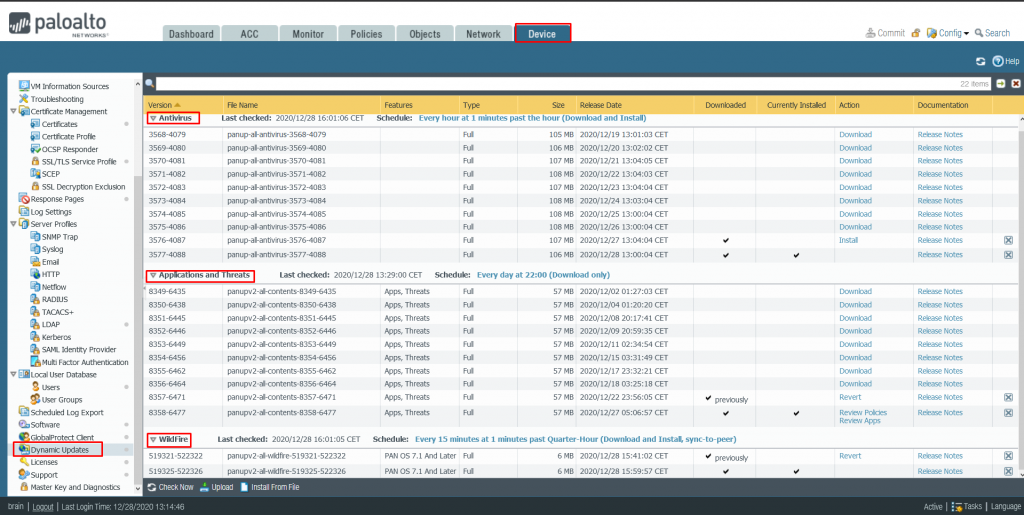
Device> Dynamic Updates
Palo Alto firewall publishes new definitions for Antivirus, Applications, and Threads, Wildfire, URL Filtering, etc., daily. To receive certain updates for a particular security profile, you must have an active license for that profile. To fully protect your infrastructure, you must purchase and activate an Antivirus, Wildfire, and Threat Prevention license separately. You can also configure how often Palo Alto will check new definitions.
5.2 Palo Alto PAN-OS update
Device > Software
Palo Alto requires updating its software to the latest version to maintain the highest protection level. However, good practice says that the large update versions jump should be waited for because these versions usually carry some initial bugs that are later corrected through x.0.1 x.0.2, etc. Updating PAN-OS software has its way. In the image below, you can see the latest available versions to update Palo Alto.
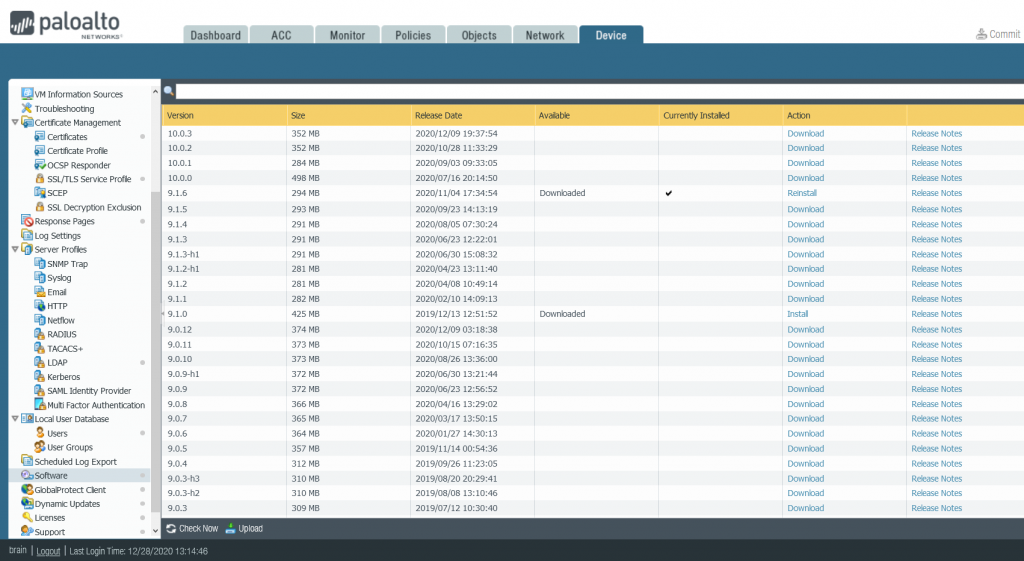
5.3. PAN-OS Update Guide
- Download the latest updates for licensed profiles and install them (Antivirus, Application and Threads, Wildfire, URL Filtering … etc.).
- Go to Software and do Check Now the latest PAN-OS versions.
- Suppose your last version is 9.0.4, the next version you need to install is 9.0.12, then 9.1.0, and then 9.1.6, then 10.0.0, and then 10.0.3.
Update path: 9.0.4> 9.0.12> 9.1.0> 9.1.6> 10.0.0> 10.0.3
- After clicking Download, Palo Alto will download the installation and prepare it for installation.
- Click Install; it takes ~ 15 minutes for Palo Alto to be installed, reset, and rebooted.
Note # 1. Between each update, update and install all available latest security profile definitions. Some versions of PAN-OS will not be available without these latest versions.
Note # 2. Before each update, commit the latest changes, save and export the configuration.
Note # 3. After each updated jump, check the firewall’s basic functionalities (traffic, logs, ping services, etc.).
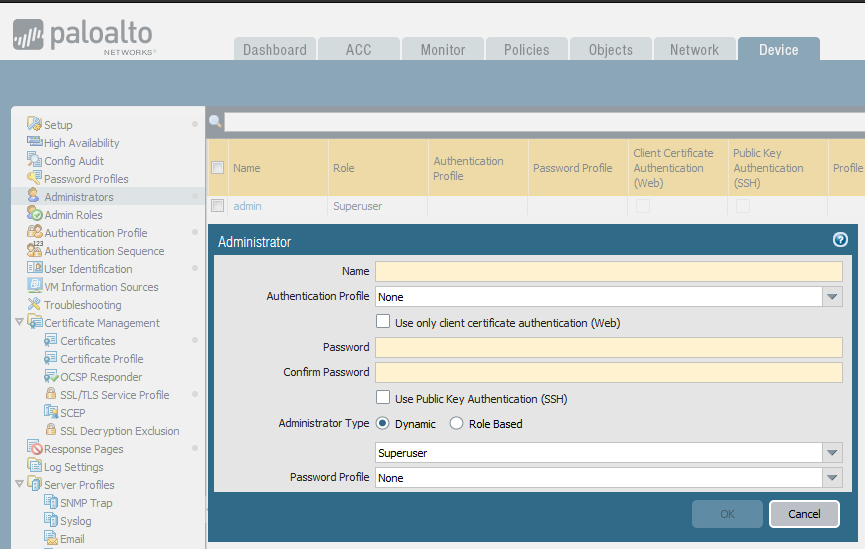
6. Administration
6.1. Administrators
The admin user is the default administrator of the Palo Alto firewall. Besides, you can add additional administrators and give each of them certain privileges.
Note # 1: This is not the same user database as the one you can find at the bottom of the Device tab.
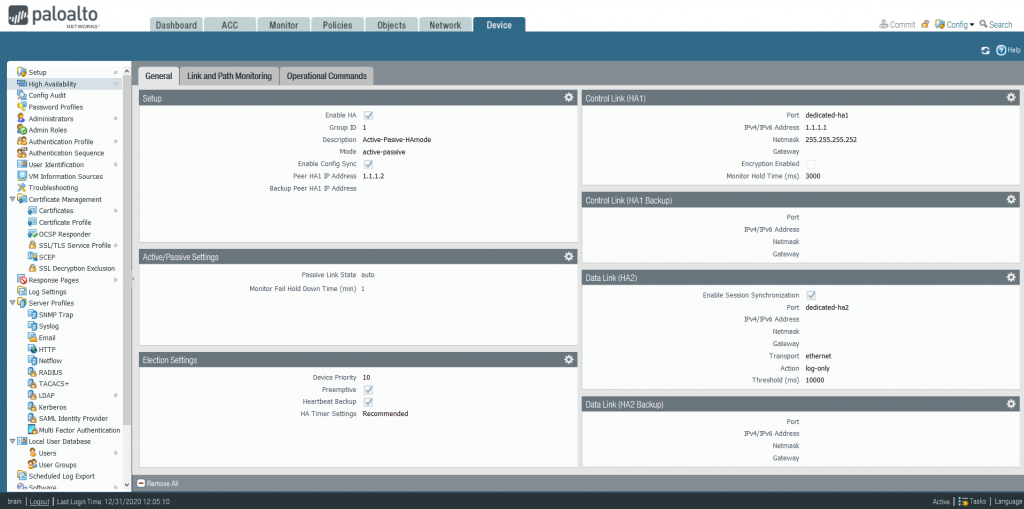
7. High Availability
This solution provides uninterrupted service and security in a firewall failure event. Ability to work in Active/Active and Active/Standby mode. In Active/Active mode, both firewalls work together. Traffic flows through both firewalls, and in case of failure of one, the other firewall takes over the load of the failed one. In Active/Standby mode, only one firewall regulates traffic. A firewall in standby mode monitors sessions and waits for the active firewall to stop responding to ping packets. In case of Active failure, the Standby firewall takes over all traffic.
7.1 Synchronization
Synchronize networks, objects, policies, certificates, and session tables. Synchronization is performed only after the commit command is executed.
Not synchronized: management interface setting, high availability setting, logs (for RA 200 series), and information from ASS card.
7.2 Prerequisites
Before you can enable high availability on Palo Alto, both devices must:
- Be the same model
- Be the same PAN-OS version
- Updated Applications, URL, and Threat databases
- HA interfaces of the same type
- Have the same licenses
In the virtual firewall case, the same hypervisor and number of processor cores are required.
7.3 Connection
Depending on the firewall model, the connection method also differs. These could be specifically assigned ports on the firewall and any other L3 ports if the firewall did not come with HA built-in ports.
HA1 link: Used for traffic management, and it is L3 link: Hello, heartbeats, HA states, routing, user ID, configuration changes, etc. Both firewalls exchange Hello and heartbeats packets at a configured interval. Heartbeats represent an ICMP ping to another firewall, and the response to that ping means that the active firewall is operational.
HA2 link: Represents data traffic, and it is an L2 link. It can also be L3 if the data link is not in the same network. With HA2 link, sessions, forwarding tables, IPsec associations, ARP tables, etc., are exchanged. It is one-way traffic and flows from the active to the passive firewall.
Backup links for HA1 and HA2 are redundant and can prevent split-brain scenarios from occurring where both devices think they are the master. When you configure backup links, the main and backup connections’ IP addresses must not overlap. Backup links must be on another network and other interfaces.
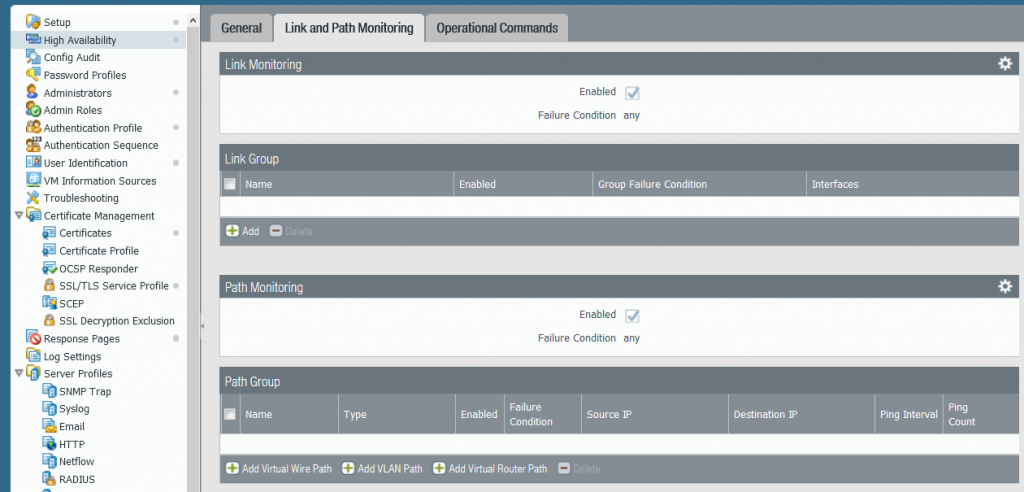
7.4 Failure Detection
The firewall uses several monitors to detect unavailability. Hello, and heartbeats messages to check if the Active firewall responds. Hello packets are sent to the active device to determine the device’s status. Heartbeats (ICMP ping) via a control link to determine availability and connectivity. You can configure the firewall to monitor the status of physical links interfaces. You can also configure the trigger when the switch occurs. Whether when any or all interfaces fall. By default, failover will occur when any link goes down, the ping interval is >200 milliseconds, or three bound pings fail.
7.5 High availability setting
Device > High Availability